Have you ever thought of what happens when you turn ON your computer? Well, once you press the power button, the BIOS (Basic Input/Output System) initializes and prepares your computer to run. BIOS is a Read-Only Memory (ROM) usually embedded on a computer motherboard that recognizes the operating system and manages the I/O (input/output) components and devices on a computer.
I’ve used four HP laptops in the past 6 years. And one thing I noticed is that the BIOS interface and its functions have remained quite similar. But unfortunately, most people do not know how to access advanced BIOS settings on HP computers. So, whenever they encounter a problem that requires BIOS settings, it becomes challenging to solve.
If you have been wondering how to access advanced BIOS settings HP, you have come to the right place. This article highlights all you need to know about advanced BIOS settings on an HP computer.
What Are Advanced Settings in BIOS?
The Basic Input/Output System (BIOS) settings are found in the Unified Extensible Firmware Interface (UEFI) outside the operating system. Its primary function is to determine what input and output devices have been connected to the computer and load the operating system for a startup. There are tons of settings that can be adjusted in the BIOS; basic and advanced settings.
So, why do you need advanced settings in BIOS?
You need advanced settings in BIOS to make CPU configuration, Chipset configuration, Peripheral configuration, disable/enable onboard LAN, SATA controller, boot configuration, ACPI control, PnP/PCI configuration, etc.
Below is a summary chart of the advanced settings in BIOS:
| Setting | Function |
| Boot Features | It includes boot order, boot device management, Legacy and UEFI boot modes, secure boot, etc. |
| Integrated Peripherals | Used to manage (enable/disable) onboard peripherals. |
| Power Management | It is the master switch for power control functions. |
| PnP/PCI Configuration | Use this option to set up and manage plug and play devices, and peripheral component interconnects (PCI) cards. |
| System Health Monitor | This feature auto-detects your system’s temperature, fan speed, chassis temperature, voltage, etc. |
| IDE/SATA Configuration | It is used to set and configure disks for RAID or intel SATA and IDE connections. |
| Password | Create, change, or disable/enable BIOS passwords. It allows you to control access to BIOS setup. |
| USB Configuration | Manages (Disable or enable) onboard USB ports. |
Some manufacturers hide or lock the Advanced Settings in their models’ preventing users from making changes. However, if you know what you’re looking for and how to do the changes, just give it a go.
How to Access Advanced BIOS Settings in HP?
BIOS settings are not something you have to see or deal with each time you turn on your computer. However, under unavoidable circumstances, you may need to access these settings.
In recent years, accessing the BIOS settings involves pressing a particular key on the keyboard while the computer is starting up. In almost all cases, the keys are F1, F2, F10, F12, Esc, or Delete. This particular information is often mentioned when you turn on the laptop.
However, with Microsoft Windows 10, introducing a unified extensible firmware interface (UEFI) and fast boot setting, getting into the BIOS settings requires a far different procedure. Below is a step-by-step approach of how to access advanced BIOS settings in HP:
- Step 1: Turn ON/Restart your computer – If your computer is OFF, turn it ON by pressing the power button. If you were using the computer, save your work and restart it.
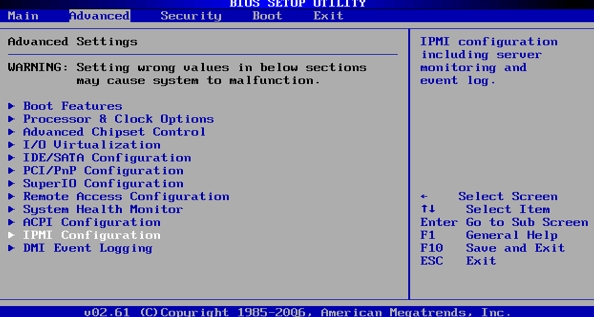
- Step 2: Enter the BIOS Settings – Press [F10] repeatedly while your computer is starting to open the BIOS settings window. You will see several tabs: Main, Advanced, Power, Boot, Exit.
- Step 3: Navigate to advanced BIOS settings – Use the arrow keys to navigate to the Advanced settings tab. Take note that your mouse/touchpad will not work in the BIOS setting window; use your keyboard.
In some HP models, such as HP ProBook HP Pavilion, you might not see the advanced setting tab; instead, you’ll see Main, Security, System configuration, and Exit. No need to worry; this means the advanced settings tab is hidden. For such a case, proceed with the steps below:
- Step 4: Shut down/Restart your computer – Once again, turn OFF or restart your computer. This time press [F9] while it is starting up.
- Step 5: Press [CTRL + F10] – This will open the Boot Manager. In the Boot Manager, you will see the Boot Options Menu.
- Step 6: Press [F10] to Get the Advanced Settings Tab – Once the Boot Manager window opens, press [F10] to open BIOS Setup Utility. At this point, you will see the Advanced BIOS Settings tab.
How to Access Advanced BIOS Settings in HP Using Advanced Options in Windows 10?
Windows 10 has advanced boot options utility dialogue that lets you perform several troubleshooting procedures on your computer. The most common selections in this dialogue include Safe Mode, Recovery, Windows Repair, and BIOS Setup.
Here is how to access Advanced BIOS Settings using Advanced Startup Options in Windows 10:
- Step 1: Click the Notification icon on the bottom right part of your Windows 10 desktop.
- Step 2: A menu with several options will appear. Click All Settings.
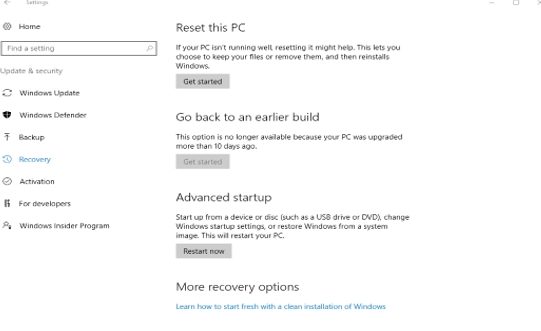
- Step 3: Select Update & Security.
- Step 4: Click Recovery on the left side of the window. You should see something similar to the screenshot below.
- Step 5: Click on Restart Now under the Advanced Startup section. Your computer will restart and present you with some troubleshooting options. Among the options will be access to the UEFI and the BIOS Settings.
- Step 6: Click on BIOS Settings. Once the BIOS Setup Windows loads, navigate to Advanced Settings.
How to Restore Default BIOS Settings in HP?
As much as you would want to adjust your computer BIOS settings for better performance, it is equally important to know how to restore default settings. Restoring default BIOS settings is essential in case you make changes that cause your computer to malfunction.
Here is how to restore BIOS Settings in HP:
- Step 1: Turn ON/Restart your computer, press [F10] while it starts. This will get you into BIOS Setup.
- Step 2: Under the Main tab, navigate to [Restore Defaults] using the arrow keys.
- Step 3: Press [Enter] to select.
- Step 4: A dialogue box will appear prompting you to confirm your selection, press [Enter].
- Step 5: Save changes and exit
Bottom Line
While you may not need to get into the BIOS settings every single day, accessing the advanced BIOS settings can help you make critical changes to the performance of your computer. Some manufacturers lock or hide this tab from the BIOS utility window for security reasons. Even though you can still access it, be sure that you know what you are doing to avoid harming your computer.
If you have read through this article, we hope now you know how to access advanced BIOS settings on your HP computer. Remember, you have to quickly press the key combination immediately you power ON your computer. Also, ensure you press [F10] to save changes before you exit the BIOS Setup utility window.