Projectors have progressively advanced in technology since their invention. Today, they have become a source of infotainment and entertainment in many places; homes, schools, workplaces, etc. But unfortunately, projectors are very expensive, and most people can’t afford them. Also, it requires a constant power supply; hence outdoor movie nights are pretty much a no-go.
So, how can you project a laptop screen on a white wall? In this case, you can create your own home projector. This DIY project doesn’t require any special equipment or advanced skills.
This step-by-step guide will help you learn how to project a laptop screen to a wall without a projector. Keep reading to find out more.
Can You Project Laptop Screen to Wall without a Projector?
The good news is YES! You can project a laptop screen to a wall without a projector. All you need to do is build a homemade projector, which works the same way an actual projector works.
For this project, you will need the materials mentioned below and follow the steps I’ll discuss later in this article.
We all know projectors are quite pricey, and you can’t just pack one in a bag and take it anywhere you go. So, does this mean you’ll have to compromise your movie experience to a 15-inch wide laptop? No!
Modern problems require modern solutions, and there’s no problem whose solution cannot be found on the internet. nonetheless, building a projector at home is quite easy, does not take much time, and acts as an excellent alternative if you want to save some money.
How to Project Laptop Screen to Wall without Projector?
If you are a DIY enthusiast, you certainly have thought of how to project a laptop screen to a wall without a projector. But before we attempt this exciting project, some tools and materials are necessary to make it successful. Most of these tools are easily accessible and materials commonly found.
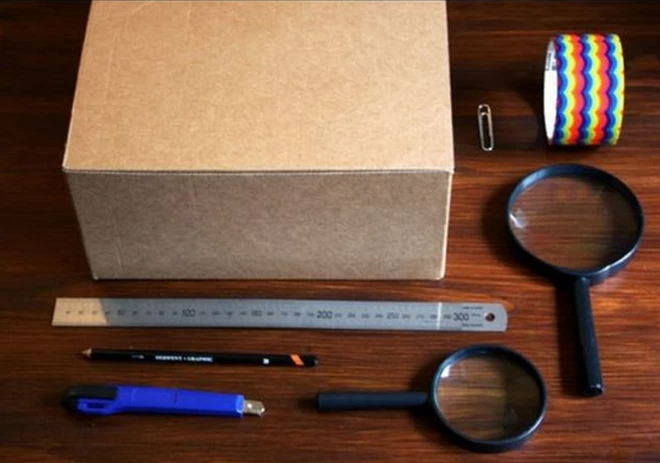
Here are the materials you’ll need to project your laptop to a wall without a projector:
- Laptop
- Cardboard box
- Pencil
- Glue gun
- Large magnifying lens
- Penknife
- Tape
- Black matte paper
- Ruler
- Brush
Once you have all the materials and tools listed above, it’s now time to start building our projector. Below is an easy step-by-step procedure to follow when projecting a laptop screen to a wall without a projector:
Step 1: Prepare the Box and Mirror
The first step is to ensure you have the correct size box and mirror for the job. It should be sized to accommodate the laptop you have; not too large. The box should have enough space to allow you to adjust the distance between your computer and the projecting lens. On the other hand, the mirror has to be rectangular and plain; and be of equal size to your laptop.
Step 2: Blackout the Interior of the Box
Cut out one narrow end of the box using a precision knife; this is where you will place the projecting lens. But, do not throw away the piece yet. Also, cut the lid of the box; this is where you will insert your laptop into the projecting box.
NOTE: Whether you are using a regular brightness or bright screen laptop for outdoor use, light reflection from the interior box wall will certainly result in image noise. This will, in turn, produce low-quality images. To prevent such a situation, ensure the interior wall of your box is black.
Using a brush and glue, stick the black matte paper to cover the entire interior of the box. Black matte paper is non-glossy, thus perfectly preventing the reflection of light. You can either buy it from Amazon or from local stationery stores. If you do not have matte paper, you can use black A4 paper or paint the box black and let it dry.
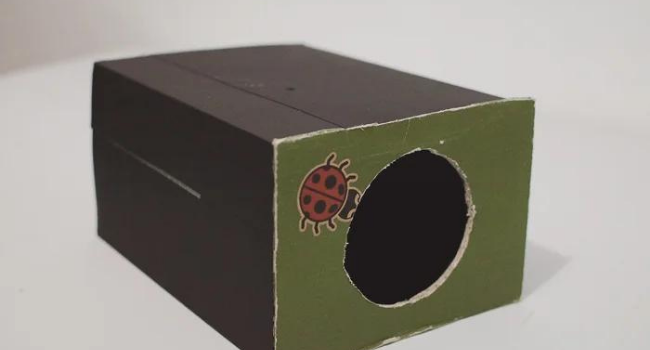
Step 3: Install the Lens
After wrapping the interior wall of the box, the next step is to fit the lens on the front side of the box. The magnifying glass will act as the lens of your projector. Remove the handle of the magnifying glass and place it on the outer front side of your box. Using a pencil, draw an outline of the lens and then cut the sketched portion using a precision knife.
Now install the magnifying glass in the cut-out section and use glue or double-sided tape to secure it on the box. Make sure it properly fits, and there is no light leaking out from the sides of the lens.
Step 4: Design an Adjustable Focus for Your Projector
Having a lens that you can adjust can help you achieve clear images. To improve the focus of your lens, you need to build another smaller box that fits into the main projector box.
After you have built the second box, make four sheets of black matte paper. Fold and carefully fit each of them at the edge of the box. You can use a ruler to obtain an accurate measurement.
Make a few shallow cuts on one edge of the small box and fold the flaps. You should also join the adjacent flaps using glue to make the box more rigid and solid. Finally, stick the lens on the small box’s flaps.
Step 5: Install the Mirror in the Projector Box
At this point, you already have an arrangement that projects images positioned left to right and turn them upside down. This shouldn’t worry you since fixing it is relatively simple.
To correct the left to right image position, you will need to use a mirror. Place the mirror against the edge at the opposite side of the lens at a 45° angle. For flipped images, you’d have to put your laptop upside-down.
Step 6: Create an Opening for Your Laptop Display
At this stage, your projector is almost ready. It’s time to create space for your laptop. Using a ruler, measure the dimensions of your laptop’s display. Draw the same measurement over the mirror on the lid of the projector box. Cut out the rectangle sketch using a precision knife.
Step 7: Set up Your Laptop
This is the final stage of the project. Once everything else is properly set, you can now select a movie or presentation and put your laptop in the projector you just built. If the image quality is not perfect, adjust the focus lens by moving the small inner box until you obtain your desired image quality.
Conclusion
How to project a laptop screen to a wall without a projector? While the DIY project I discussed above sounds like a complicated idea, the steps involved in building it are straightforward. This project is an excellent way to test your creativity and develop patience. If done properly, the result is astonishing.
While a homemade projector may not match the quality of a real projector, it is cost-effective and worth trying out. After reading this article, we hope that you’ll be able to build your own projector and enjoy movies with your friends.